


Monarch Life Cycle
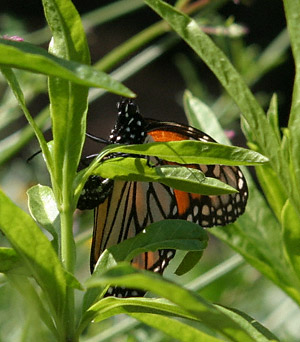 Here's momma laying eggs in early March 2005 on our native milkweed, Asclepias fascicularis (Narrowleaf Milkweed). She also liked A. curassavica (Tropical or Brazilian Milkweed); A. speciosa was starting to emerge from its winter dormancy, but we've never found a female who liked to lay eggs on it anyway (the leaves are rather thick and hairy). The female tends to lay eggs on fresh, new growth, underneath a leaf, and only on plants in the Asclepias family (“milkweed” is a common name sometimes applied to other species). The eggs are about the size of an aphid, and are a white/creamy color. She will search the vicinity for more milkweeds once she finds one plant, and will lay multiple eggs on each plant. You can never have too much milkweed, which is why we grow extra milkweed in pots.
 "Let me out!", says Paddy...
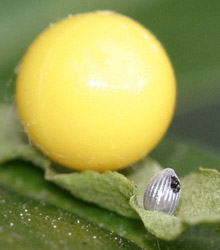
The weather was pretty cold this month, so the eggs took around 10 or more days to hatch (they usually take around 6 days). Here's one of the eggs hatching just in time for St. Patrick's Day (March 17).
Any eggs that we found on plants in the garden we moved to potted milkweed and put them in a cage. On garden plants, eggs are at the mercy of insects and other predators, but potted milkweed may also have predators; if we know they are egg-free, we hose them down to remove aphids, ladybug or lacewing larvae, spiders, earwigs, and so on. If the plants have eggs on them, we remove the leaves with the eggs first, then hose the plants down.
To move an egg, take the entire leaf (the egg is stuck to the leaf), and carefully pin the original leaf to a leaf on the clean potted milkweed (or cutting). The yellow ball in the photo is the head of a colored pin holding the original leaf in place. The original leaf will dry up, but the egg will be okay, and the caterpillar will move onto the fresh leaves once it hatches (it's pretty smart that way!).
You can use milkweed cuttings, but we find that by the time the eggs hatch, the cuttings may already be drying up. We find using live plants to be far less work and the leaves stay fresh. If you prefer to do cuttings, we suggest you remove the leaves with the eggs from garden plants, place these leaves on damp kitchen paper until the eggs begin to turn gray (around 5 days), then pin them to fresh cuttings. But this requires careful vigilance so you don't forget about them or let the kitchen paper dry out; a covered container will retain humidity. (We often use a hybrid approach: we put the eggs on damp paper, wait until a few start to turn gray, then pin them to the potted plants. This reduces the number of days they are vulnerable to a predator we may have missed on the potted milkweed.)
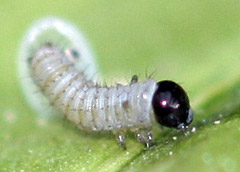 Once the egg hatches, the little caterpillar will turn around and promptly eat its egg shell. Protein, yum! They will then eat a small hole in a nearby leaf, and then move up to the top of the stem in search of the tender new growth. There are five “instars” (stages of growth), this being the first.
 2nd instar: After the first molt, the caterpillar has doubled in size and is starting to get a little color. They are still pretty small at this stage (5 to 10mm), so are easy to miss as they hide in the foliage and flower heads. Don't panic if you can't find them all – they usually become visible in a few more days when they grow a little more.
At this stage, it's best not to move the plants, or shake the cage, or do anything that would make the young caterpillars think that a bird had landed and they are in danger. Some of them have a tendency to “jump” off the plant when spooked; they may remain attached to the leaf by a thin thread and then they climb back up on their own, but they may end up detached on the floor of the cage or in the dirt. And while they can't “hear” (no ears you see), we've found that just talking loudly (or having kids shouting at them) must disturb the air enough that they also get spooked by “big bird” soundwaves. As they get older, you'll find the kamikaze guys get used to the cage being opened and so on, and will tend to jump less.
If you're using potted plants, keep inspecting your plants for ladybug and lacewing larvae, as the caterpillars are still vulnerable at this stage to predators; if possible, keep plants separated to isolate the predator to a single plant.
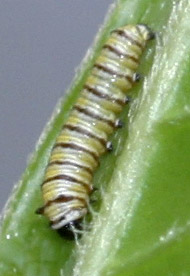
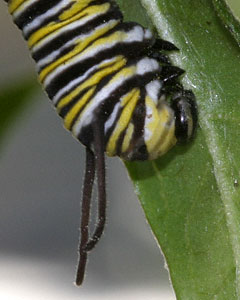
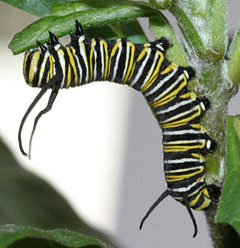
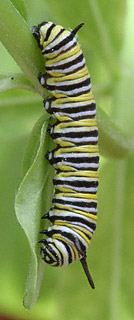 3rd instar: A few days later, and half again as big. One way to tell which instar they are is by the length of their antennae (or filaments); in case you're having trouble figuring out which end is which, the pair at the head are longer than the tail! (If you see antennae in the center of the body as well, you have a Queen caterpillar, not a monarch!)
Within each instar, they tend to start out looking pretty wrinkly, but after they eat for a bit they quickly fill out their new skin. While they are molting, they take a day or two off from eating; don't be alarmed by the lack of movement, and don't try to push food under their nose and shout “eat! eat! you must eat!” (you know who you are)
Size-wise, they are out of the danger zone for small predator insects. If they were in a garden setting, their main predators now would be birds and parasitic flies and wasps (who either feed them to their young or lay their own eggs inside the monarch caterpillars). It's true that birds don't like the taste of monarch caterpillars, but we assume they have to eat one to find that out.
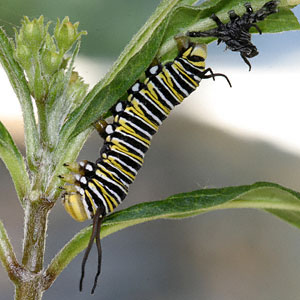
 4th instar, molting to 5th instar (April 9): One way to tell if the caterpillar is about to molt is to look closely at its face; here you can see the old face is like a little “button” that looks like it's about to pop off its nose (it does!). The old skin has separated from the face; the brighter yellow head in this photo is the fresh head of the 5th instar. Notice how long the antennae are by the 4th instar – and they are about to get even longer!
While a caterpillar is molting, remember not to disturb it by moving it or trying to get it to eat – you may interrupt its natural cycle and cause harm. If you have lots of caterpillars, make sure another caterpillar doesn't start eating the leaf where one is molting! On busy plants, we find the caterpillars will often move off the plant to molt in peace on the side of the pot, or the wall of the cage. Let it be. Remember the first rule of raising caterpillars – they know what they are doing!
 After emerging at the 5th instar stage, the old skin is left behind (see photo). The wiggling takes just a few minutes, but it will have to sit for an hour or two afterward while the new skin hardens. The new antennae start out slicked back on the body, but they shake free. The color of the head will darken shortly.
Not shown: the caterpillar will turn around after an hour or so and eat its old skin (more protein). Believe us, you don't really want to see that bit.
 Paddy, we hardly knew you! A few hours after molting, and Paddy's appetite has returned. Notice how quickly the head has regained the strong striping. From here on in, it's munch, munch, munch until the caterpillars are so fat they look like they are about to explode! And then they'll eat for another day after that! Putting live plants in the cage when they are in the final stage is sorta like feeding a cow to a pond of piranha...
For those of you who think they can raise caterpillars on the windowsill, think again. Once we left some potted plants in the greenhouse, and the caterpillars wandered all over the place looking for a place to molt – so always use some kind of cage (a cylinder of window screen with a screen top is adequate in a pinch).
If the caterpillar molted on the side of a large cage, it may get lost looking for the food again (you'll find these ones wandering about, looking very dark and wrinkly; if it's big 'n' fat, it may be looking for a place to make a chrysalis). So how do you move a lost caterpillar? We never handle the caterpillars directly, and again, we never move them unless that are active. We've found the easiest way is to take a tissue, and carefully “wipe” the side of the caterpillar; the legs are so sticky that it immediately sticks to the tissue. Then place the tissue at the base of the plant with the caterpillar's head facing the stem – they may pout for a little while, but will quickly climb up the plant. If you need to really get it to move onto a leaf, tickle its bum with a tissue or another leaf – it must think there's a bird behind it and it will trot right along! We've also read that you can use a small paintbrush to move them (roll the brush under their tummies), but we prefer the tissue technique (plus its sanitary).
If you run out of milkweed at this stage and have to buy some at a local nursery, be sure to thoroughly hose it down to remove any pesticides. Nurseries may spray milkweed with BT to avoid caterpillars damaging the plants, or spray with other chemicals to kill the aphids; and the reseller doesn't know what the growers have sprayed so don't take a chance. (Been there, done that, dead cats was the results – that's why we now grow our own.)
If you like to propagate, A. curassavica is particularly easy from seed and will also take from cuttings; start it in spring and you'll have bushy plants by fall (available from commercial seed stores or from Milkweed Farm and Educational Science). We particularly like the ‘Silky Gold’ selection if you can find it. You can find our native milkweed (A. fascicularis) at the Theodore Payne Foundation; it's also easy from seed started in the spring but is more difficult to keep happy over a number of years unless you find a spot in the garden it really likes. Both are very drought tolerant if you garden in Southern California. We've given up on the other CA native milkweeds (too difficult to grow or too hairy for the females).
By the way, despite rumors to the contrary, monarch caterpillars will eat non-native milkweeds, and will switch from eating one species to another quite readily. And it's not true that the sap in native milkweeds offer better protection; monarch expert Walt Sakai assures us that A. curassavica is even more toxic to predators that A. fascilcularis!